Rikus
7 posts
Jan 25, 2010
12:15 AM

|
Hey there MBH'ers,
After trying various plastic combed harps, I finally got my first Marine Band end of last week and promptly set to customizing it over the weekend. Here are 2 pics of the results:
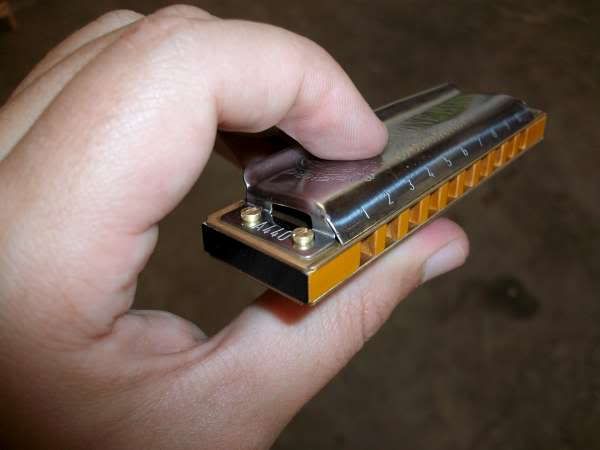
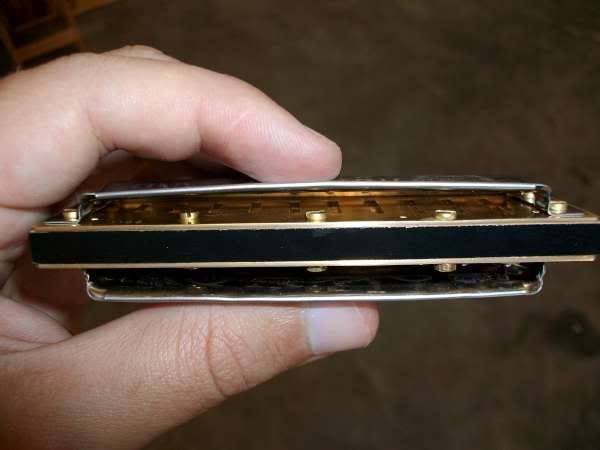
I replaced the nails with bolts and opened up the coverplates (I'm not happy with their shape yet, so they're coming off again so I can even them out a bit).
Next up is flat sanding, sealing and then the dreaded reed work...
Now the question, I've seen a couple of people flat sand the draw reedplate. It there any benefit to this in terms of air tightness? Will it compromise the rivets if their ends are sanded flat with the reedplate?
Any advise would be appreciated.
Thanks,
Rikus.
Edit for slightly smaller pictures.
Last Edited by on Jan 25, 2010 12:19 AM
|
Kingley
683 posts
Jan 25, 2010
2:24 AM
|
That harmonica is looking good Rikus.
To answer your questions.
It shouldn't have any adverse effects on the rivets unless you sanded it excessively and not flat.
It isn't always necessary to flat sand the reedplate. It will however improve the air tightness on a harmonica that requires it sanding.
|
Buddha
1314 posts
Jan 25, 2010
5:02 AM
|
if you really want to do it right you have to remove all of the reeds and flat sand both sides of both plates.
----------
"The privilege of a lifetime is being who you are." - Joseph Campbell
|
Rikus
8 posts
Jan 25, 2010
6:20 AM
|
Thanks Kingley!
Buddha, thanks for the input. That is however something I won't try just yet. If I want that sort of perfection I think I'll leave it to the likes of yourself.
R.
|
tookatooka
1067 posts
Jan 25, 2010
6:25 AM
|
"if you really want to do it right you have to remove all of the reeds and flat sand both sides of both plates". Bit over the top isn't it? The reedplates will buckle again just as soon as you tighten the bolts (assuming you use the wooden comb).
----------

|
Buddha
1315 posts
Jan 25, 2010
8:05 AM
|
a bit over the top? You're asking if I'm a bit over the top? I do everything over the top and that's the basic difference between me and just about everybody else.
----------
"The privilege of a lifetime is being who you are." - Joseph Campbell
|
isaacullah
607 posts
Jan 25, 2010
11:50 AM
|
Hey there Rikus. Good start! I have one minor suggestion for you. I see you drilled out BOTH coverplate nail holes and hence are using FOUR screws to attach the coverplates. My advice is to ditch the rear two screws. Why, you ask? Well, you don't really need two points of pressure on the ends. You have have those three reedplate screws along the back. Them, combined with the two front coverplate screws are all you really need to hold everything together with the optimum pressure pattern. Almost more importantly, however, if you every have to get "under the hood" fast, it's much mroe difficult and time-consuming to have to undo FOUR nuts and bolts than just two. Plus, especially as a beginning customizer, you are going to be taking the coverplates off your harps VERY frequently. Trust me you are going to get annoyed with how many times you have to screw/unscrew all four of those bolts. However, that being said, it's a very nice job you've done so far indeed!
----------
------------------

The magnificent YouTube channel of the internet user known as "isaacullah"
Last Edited by on Jan 25, 2010 11:52 AM
|
isaacullah
608 posts
Jan 25, 2010
11:51 AM
|
PS, don't worry about affecting the rivets. Just sand the thing flat. You'll have no troubles.
----------
------------------
The magnificent YouTube channel of the internet user known as "isaacullah"
|
Blueharper
11 posts
Jan 25, 2010
11:59 AM
|
Buddha, By God your Pimp Hand is strong!
|
Rikus
9 posts
Jan 26, 2010
3:56 AM
|
Thanks for the feedback Isaac. I am also pretty pleased with the results for a first attempt.
I drilled both holes purely for aesthetic reasons, but you make a valid point regarding “getting under the hood” quickly. Sanding and sealing is on the menu for tonight, so I think I’ll drop those 2 bolts when I put it back together again. :D
|
Oliver
131 posts
Jan 26, 2010
6:11 AM
|
Regarding the 4 screws: I really don't like the way the harp looks with just 2 screws, and the holes at the back where the nails used to be. I know that sounds silly.
So I guess I'm asking, aside from the inconvenience of having 4 screws to undo, is there any other disadvantage to having 4?
P.S. Looking good so far Rikus. You have approached customising the opposite way round to how I have done it, first thing I did was emboss and gap, and I still have not got round to re-drilling and sealing / sanding / screwing just yet.
|
Kingley
694 posts
Jan 26, 2010
6:19 AM
|
"So I guess I'm asking, aside from the inconvenience of having 4 screws to undo, is there any other disadvantage to having 4?"
No there isn't any Oliver. Having the 4 screws is purely an aesthetics thing.
|
Oliver
132 posts
Jan 26, 2010
6:29 AM
|
Great, thanks Kingley.
Perhaps I place to high a value on the aesthetics of the thing we play, but it is important to me none the less so that's good to hear.
|
Rikus
10 posts
Jan 26, 2010
6:44 AM
|
Thanks Oliver!
I didn't need the harp playable at its best immediately, so I thought I'd manhandle the harp first and do the sensitive work afterwards when it’s properly sealed etc.
I also don't like the look of the 2 empty bolt holes. I've got some ideas on how I might try and fake it though. :D
|
Oliver
133 posts
Jan 26, 2010
7:02 AM
|
Yeah, doing all the rough stuff first sounds like a good idea... I just didn't have all the needed tools and stuff available to me at the time, and I was impatient!
Regarding the screw hole thing, I have seen people cut off the corner of the back of the cover-plate where the back nail hole is. I'm undecided as to how I like the look of this, and could not say whether or not this is a good thing to do. But just an idea.
|
isaacullah
616 posts
Jan 26, 2010
11:53 AM
|
@Oliver:"So I guess I'm asking, aside from the inconvenience of having 4 screws to undo, is there any other disadvantage to having 4?"
Actually, I CAN think of one slight disadvantage. It's a little known fact that the reedplate can deform enough to cause leaks if you overtighten the reedplate screws. This is why some people (eg. Dave Payne) actually prefer the nails (not me!). The more screws you have, the more chances for these little deformations to add up to big deformations. This is why I like the minimalist approach: 2 or 3 screws along the back of the reedplates, and 2 coverplate screws in the front corners. Together that's only 4-5 points of pressure, all optimally spaced out so that the deformations caused by tightening the screws have as little interaction as possible. Remember, you've got to tighten those screws only until they are JUST snug enough not to come undone. If you ratchet them down, you are causing deformation. Aesthetically, I just take a small peen hammer and a hobby anvil, and hammer the back coverplate nail holes flat. After you do that, you don't even notice them.
----------
------------------
The magnificent YouTube channel of the internet user known as "isaacullah"
|
isaacullah
617 posts
Jan 26, 2010
12:23 PM
|
@Rikus: "I didn't need the harp playable at its best immediately, so I thought I'd manhandle the harp first and do the sensitive work afterwards when it’s properly sealed etc."
This is definitely the way you ought to do it! My routine is thus:
17 Steps to a Better Harp,
By Isaac Ullah
Step 1: pop out the front two coverplate nails using a small knife blade (leave back to nails in for now)
Step 2: Drill out these two front holes using a drill bit that's wide enough to leave easy clearance for the screws I'll use (I use size 2-56).
Step 3: Pop of the other two nails, and remove the cover plates.
Step 4: Debur the holes I just drilled if needs, and tap the back coverplate nail holes flat with a small hammer and anvil.
Step 5: Pry up the reedplates with the knife blade and remove all the nails.
Step 6: Temporarily hold the reedplates back on with two bolts through the coverplate holes we just drilled (don't put the coverplates on though). Make sure the reedplates are aligned properly (I just make them even with the front of the comb), and tighten the screws up.
Step 7: Drill the reedplate screw holes out. I use the draw plate nail holes (there are 3) as a guide. Use a drill bit that is slightly narrower than a 2-56 screw.
Step 8: Unscrew the reedplates. Use a 2-56 tap to tap the holes in the draw reedplate you just drilled.
Step 9: Use the next wider drill bit or a diamond reamer bit to widen the drilled holes in the blow reedplates a bit until a 2-56 bolt will have easy clearance.
Step 10: Flat sand the comb with GENTLE pressure. Round off all the comb tines with a light sanding.
Step 11: OPTIONAL! Reassemble the harp completely, take it to the belt sander, and round off the ends. This is optional, but I think it feels better in your hands if you do this. After you rough the shape in on the belt sander, hand sand to a smooth finish. Disassemble the harp.
Step 12: Dust the comb off, and let it soak, fully submerged, in mineral oil for a few days. I use an old plastic harp case (from a Marine Band) to do this soaking, and mineral oil from IKEA.
Step 13: While the comb is soaking, flat sand the draw reedplate with gentle pressure until it is FLAT. Do any reedwork and embossing and retuning that I want to do.
Step 14: Fold down the back tabs of the coverplates (I just use pliers, others use a vinyl mallet).
Step 15: After the comb is fully impregnated with the oil (minimum 3 days or so), take it out and let it dry.
Step 16: Reassemble the combs with the reedplates making sure everything is aligned. Do all the gapping as per the Joe Spiers videos.
Step 17: Put the coverplates back on, and tweak them so that they are more open (again, I just use pliers, squeezing at the ends with a little upwards turn).
And there you go! After just 17 "Easy" steps, your OTB harp is now a wonderful "professional" instrument! ;)
----------
------------------
The magnificent YouTube channel of the internet user known as "isaacullah"
|
Ryan
79 posts
Jan 26, 2010
2:48 PM
|
"if you really want to do it right you have to remove all of the reeds and flat sand both sides of both plates."
Why would you need to sand both sides of both plates? I thought the point of sanding the plates was to make them completely flat (just like the comb), that way they make an airtight seal with the comb. If this is true wouldn't you only need to flat sand the sides of the plates that come in contact with comb (which would mean you'd only have to remove the reeds from the blow plate). Is there another reason to sand the plates(specifically the sides that don't come in contact with the comb)?
Also, can you use sand paper to flat sand the plates (if so, what grit do you use?) or do you need to use a flate bastard file?
|
clarksdale
37 posts
Jan 28, 2010
1:04 AM
|
Why not buy a Special 20?
*Rotten Tomatoes begin to fly towards me...*
Nevermind, my BAD! Marine Bands do sound great, i just don't have the patience to fool around with them. Have fun everybody, sorry, was just trying to lighten up the tension in this thread.
----------
$Daddy Rich$
"The Blues is Ok!"
|
Rikus
11 posts
Jan 28, 2010
4:17 AM
|
Awesome post Isaac! :D Thanks!
I was in two minds about optional step 11, and I ended up not rounding of the corners. I think I’ll leave that for when I try my hand at making a composite comb.
Valid question Clarksdale, and it has a very stupid answer.
Hohner does not have an official presence in South Africa and the company who brings in Hohner stuff does not bring in the Special 20. It's actually shocking how little they know next to about their own product. When I finally tracked them down I asked them about Sp20's and was told that the Hohner Bluesharp is basically the same thing as a Sp20.
In terms of Hohner, most music stores only stock the MS harps (Pro harp, Big River and Bluesharp) and the cheapy the Silverstar. Music stores can however get Marine Bands if they special order them... which is why I went for Marine Bands (plus the customizing appealed strongly to the tinkerer in me).
Cheers,
R.
|
Nastyolddog
126 posts
Jan 29, 2010
5:06 PM
|
Thanks to MBH I saved $60 today i retuned my Harp instead of tossing it over my shoulder
|
clarksdale
38 posts
Jan 30, 2010
12:35 AM
|
Wow, that is Crazy RIKUS. You would think they would stock the 20's.
I've got a tinkerer in me as well friend. Fortunately AND unfortunately i've a Wife and a 1 year old, which leaves me NO TINKER TIME!
I just have to settle with a speedy Gapping job so i can get my fav. 6 OB and 7 OD and away i go.
I do wish Hohner would quit BSing and offer a Marine Band with SCREWS that isn't freakin' $60!
Now THAT is ridiculous.
And i Can't believe the Crossover is tuned as i've read. Does the Marine Band "Deluxe" hold closely to the JUST tuning?
-$DR$
----------
$Daddy Rich$
"The Blues is Ok!"
|